This section introduces the steps for scheduling new sections of a class.
At the completion of this section, you will be able to:
- View all courses from the course catalog that can be or have been scheduled for a term
- Add new sections of a class to the schedule of classes
- Enter class meeting information, instructors, and enrollment caps
- Navigate to the Schedule New Course component. Complete the following:
- Term
- Subject Area
- Campus
- Click Search.
Results will show you all classes with the Subject Area available for scheduling (according to the Course Catalog).

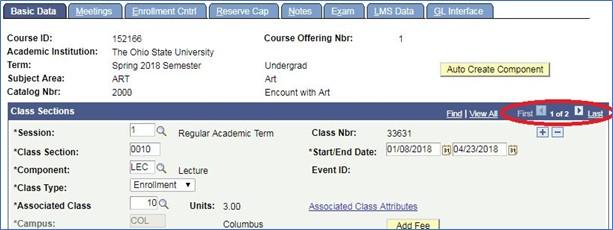
Select a Course Offering.

- Make sure the default Session is correct.
To change the Session, click the magnifying glass and select the appropriate Session (i.e. 7W1, 7W2).
- Type the next sequential number in Class Section.
- It is preferred to use increments of 10 (i.e.0010, 0020, 0030, etc.) for the Class Section number. Class sections will appear in order by Class Section number in the Class Search.
- Type in an Associated Class number.
The Associated Class number is to be different for every section of a standalone course. Sections should only have the same Associated Class number if students are to enroll in more than one section (i.e. the student needs to enroll into a Lecture, Lab and Recitation for one course). See Create a Class Association for additional information on Associated Class numbers.
- Uncheck the Schedule Print box if the section should be hidden from view in Schedule of Classes.
- Change the Instruction Mode if class is not taught in person.
SIS Instruction Mode Labels
Distance Learning (DL)
Instruction Mode: DL
Description: Distance Learning
Percentage of formalized instruction eligible to be completed at a distance: 100%
Percentage of formalized instruction required to be completed in person: O%
Distance Enhanced (DH)
Instruction Mode: DH
Description: Distance Enhanced
Percentage of formalized instruction eligible to be completed at a distance: 75 to 99%
Percentage of formalized instruction required to be completed in person: 1 to 24%
Hybrid Delivery (HY)
Instruction Mode: HY
Description: Hybrid Delivery
Percentage of formalized instruction eligible to be completed at a distance: 25 to 74%
Percentage of formalized instruction required to be completed in person: 25 to 74%
in Person (P)
Instruction Mode: P
Description: In Person
Percentage of formalized instruction eligible to be completed at a distance: 100%
Percentage of formalized instruction required to be completed in person: O%
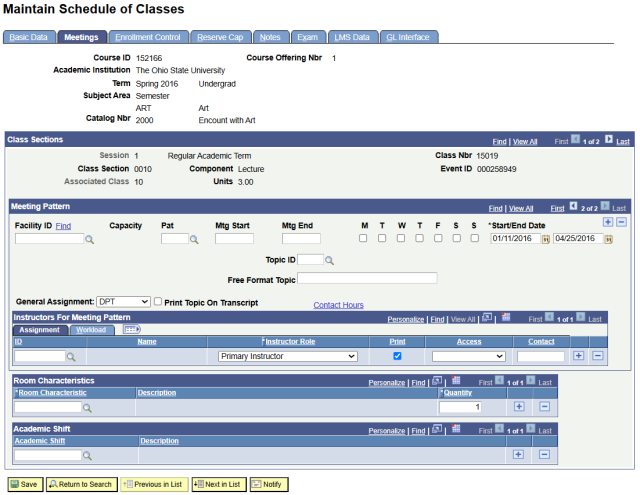
- Click the Meetings tab. Complete the following fields:
- Facility ID Click the Find button and see Search for an Available Facility to search for available space.
- Mtg Start (Meeting Start
- Mtg End (Meeting End)
- Check days of the week
- General Assignment
- NSM - Need the scheduling office to assign you a room
- DPT -Department -owned room or does not require a room (this is the default)
- ASM -Pre-assigned room (rolls forward from year to year
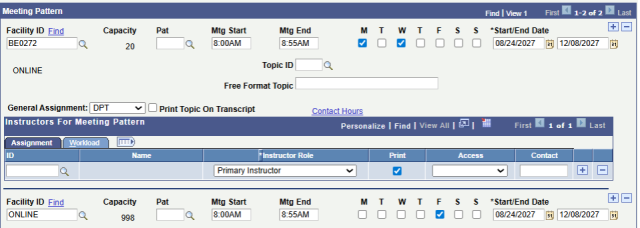
To add another meeting pattern to one section, click the blue plus (+) sign under the Meeting Pattern heading.
- Meeting Pattern Examples for Different Modes of Instruction
- DL and DH Courses
Synchronous Meeting Pattern: Meeting online as a class at specified days and times.

Asynchronous Meeting Pattern:No specified meeting days and times

- DL and DH Courses
- HY Courses
Specify which days are in person and online by adding additional meeting pattern.
- Complete Instructor Information.
- ID - Click the magnifying glass to search by name or email.
- If searching by first and last name, make sure you choose the correct person. There are usually multiple people in the database with the same first and last name, so scroll down the results and select the correct one. Scrolling all the way to the right will also show the department.
- Instructor Role- Choose between Primary Instructor, Secondary Instructor, TA, Grader, Lab Assistant, or Guest Speaker. Click the blue plus sign to add multiple instructors.
- Access- The drop-down Access list indicates what authority this instructor has related to grading.
- Post: Instructors assigned Post access can enter grades into the grade roster and post these grades to students' official records. This is the highest level of access, and at least one listed instructor needs this access in order for students to receive grades.
- Approve: Instructors assigned Approve access can enter grades into the grade roster and approve grades already entered, but do not have access to post these grades to the students' official records.
- Grade: Instructors assigned Grade access can enter grades into the grade roster, but do not have access to post these grades to the students' official records.
- Instructions on posting final grades in the Faculty Center can be found on the Buckeye Link Faculty/Staff page. Under "Faculty Center Help" click on the Navigating Faculty Center link.
- Instruction for how to list instructors in regards to generating SLEs can be found on our website General Survey of Student Learning Experience (SSLE) Information
- Uncheck the Print box if you'd like to hide instructor's name from the Schedule of Classes.
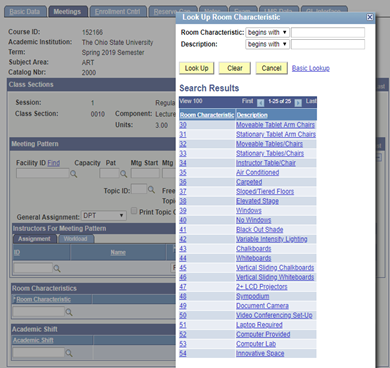
- Enter Preferred Room Characteristics (if applicable).
If you would like a classroom assigned to you, change the General Assignment to NSM, and enter any preferred Room Characteristics by clicking on the magnifying glass and selecting any desired options.
- Click the Enrollment Control tab. Complete the following fields:
- Requested Room Capacity
- Enrollment Capacity
Wait List Capacity
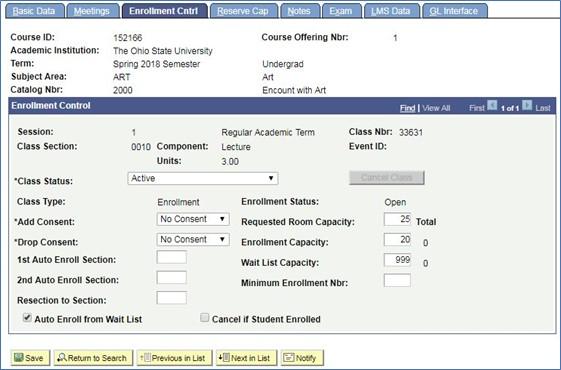
- Click Save.
- The class number is now assigned, and the Enrollment Status is Open.
- Change Class Status (if necessary)
- Click on the Class Status drop-down box and choose from one of the following options:
- Active
- Stop Further Enrollment
- Tentative
- Cancelled Section
If no students are enrolled, change status and click yellow Cancel Class button
If students are enrolled, contact enrolled student to inform of cancellation before proceeding. Check 'Cancel if Student Enrolled' box first, then change status and click yellow Cancel Class button.
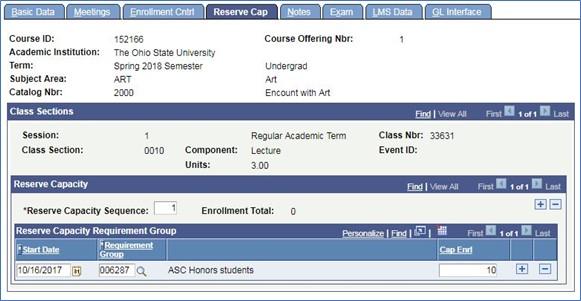
- Click the Reserve Cap tab.
The Reserve Cap (capacity) is placed at the section level and allows seats to be held for a specific population of students. Reserve Caps can be set by contacting the specific Semester Manager in the Scheduling Office.
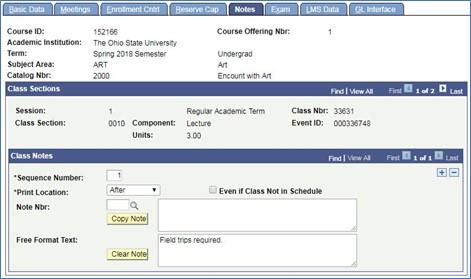
- Click the Notes tab.
- Notes appear in the Schedule of Classes and can provide additional information about this class such as "evening exam" or "field trips required." Notes can be selected from a predefined list or created using free-format text.
Notes will be viewable by the students through Class Detail in the Class Search.
- Notes appear in the Schedule of Classes and can provide additional information about this class such as "evening exam" or "field trips required." Notes can be selected from a predefined list or created using free-format text.
- Click the Exam Tab.
Final exams are assigned by the Scheduling Office and are mostly done via a batch process. They will assign the Exam Date, Exam Start and Exam End information based on the Final Exam Schedule.

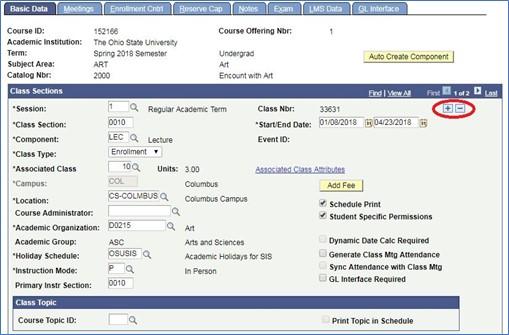
- Insert an additional section.
Add a new section by clicking the blue plus (+) sign on the Basic Data tab.
- Repeat Steps 3 through 12.
Scroll through sections using the arrows on the Basic Data tab.
- Once classes have been scheduled, use the Maintain Schedule of Classes path to make any changes to the sections.
Meaning of all numbers seen on the Basic Data tab
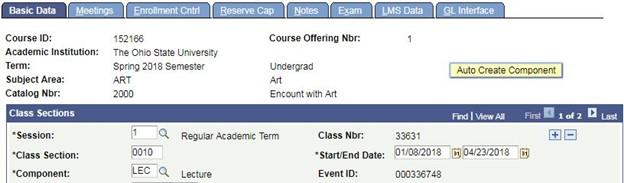
- Catalog Nbr is the 2000 in ART 2000, or the Course Number.
- Course ID is the number assigned to a course in the Course Catalog. It is rarely used by Scheduling Contacts.
- Class Section number determines the order of how sections will show in the Class Search, lowest to highest.
- Class Nbr is the unique number each semester assigned to each section of a class. Students use this number to enroll into courses. A section can be searched for by its class number in Schedule Class Meetings only. It is also used on the Combined Sections table to combine classes.
- Event ID of a class is not used for any scheduling purposes. The number will populate when a room has been scheduled.
Important Information
Difference Between Schedule New Course and Maintain Schedule of Classes
- The Schedule New Course function displays all courses available to schedule.
- Use Maintain Schedule of Classes to modify or maintain data for classes that have already been scheduled.
- The functionality of Maintain Schedule of Classes is identical to Schedule New Course, but the view of classes offered is limited to classes already on the schedule.
Changing an Associated Class number or Session Code
- Once a student is enrolled into a section for the semester, the Associated Class number and Session Code cannot be changed.
Instructors and Grading
- At least one instructor needs to have Post access in order for students to review grades.
- Instructions for posting final grades in Faculty Center can be found on Buckeye Link Faculty/Staff page. Under "Faculty Center Help" click on the Navigating Faculty Center link.