Who Can Perform These Steps?
Ohio State AWS account owners and their backups can create and manage custom roles.
Why Create a Custom Role?
By default, your Ohio State AWS account has two defined roles for which you can add and remove users through the Group Management System. Those roles are:
- ReadOnly
- Developer (full access).
There are many times when you will want to provide a user working in your account with only the access they need to perform their role.
When you need to restrict access of someone who must access your Ohio State AWS account. Custom roles should be used to provide the user only the access and permission to the services within your account that they need to perform their role. Examples are:
- A third-party vendor contracted to perform development work in your Ohio State AWS account.
- Students assisting you with a research project.
Step 1: Create a Role in AWS
Navigate to and log into the AWS console.
Under IAM, create a new role and add the appropriate permissions to the role. Learn more at What is IAM AWS documentation.
Capture the exact name of the role you created in AWS (included case). The exact name of the role will need to be created in GMS as well.
An additional step to the newly created custom AWS role needs to be configured. Under the Trust relationships the following policy needs to be added to integrate AWS with GMS. Replace the XXXXXXXXXXXX with your AWS account number.
{
"Version": "2012-10-17",
"Statement": [
{
"Effect": "Allow",
"Principal": {
"Federated": "arn:aws:iam::XXXXXXXXXXXX:saml-provider/webauth.service.ohio-state.edu"
},
"Action": "sts:AssumeRoleWithSAML",
"Condition": {
"StringEquals": {
"SAML:aud": https://signin.aws.amazon.com/saml
}
}
}
]
}
Step 2: Create a Group in GMS
Navigate to and log into the Group Management Service.
Locate and click on the AWS folder for the account you want to add the group to.
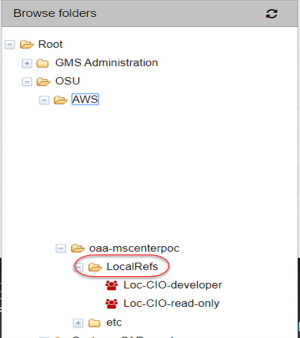
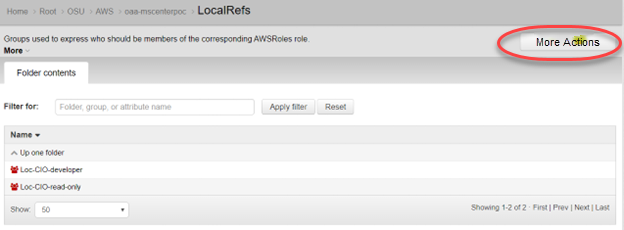
Locate and click on the LocalRefs folder of your AWS account.
Select Create New Group from the More Actions drop down.
The following page should appear (example only):
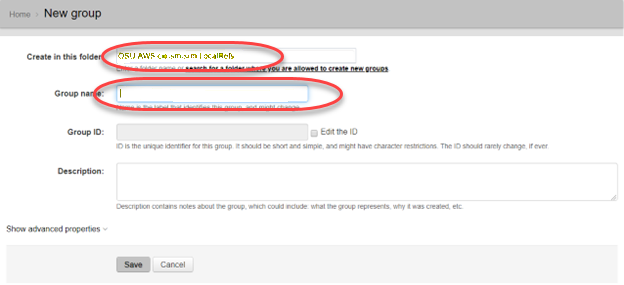
Verify that you are creating the new group in the correct LocalRefs folder (see “Create in this folder field”).
Enter the exact name of the AWS role you created in AWS. Case sensitivity matters. You will not be able to delete the group once it is created, nor change its name in a meaningful way.
Note: After you click “Save” GMS will prepend “Loc-” to the group name automatically. That is normal behavior of the system and will not affect the name matching to the AWS Role you created.
Click Save.
Step 3: Add User(s) to the GMS Group
Access the new GMS group you created in Step 2.
Click the “Add Members” button.

The following data entry page should appear:
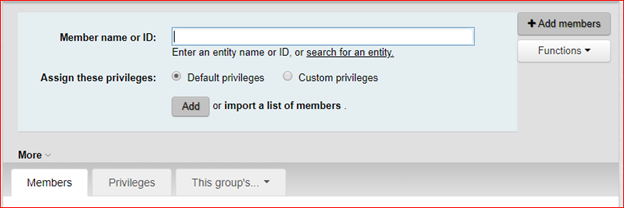
Type the name.# of the user you want to add to the group into the Member name or ID.
Note: You can also import a list of name.#s using “Import Members” option
Leave Assign these privileges set to Default privileges.
Click the Add button. GMS will display a confirmation if user was added successfully.
The new user can now access the selected Ohio State AWS account via go.osu.edu/awsconsole using their Ohio State log in credentials and BuckeyePass. Once they do, the limitations of what they do in the Ohio State AWS account will be defined by the permissions of the IAM role you created in AWS.
Be sure to remove the user from the pre-defined role in GMS if they no longer need to have that role (e.g. User X be default is in the “developer” role in GMS and a new role you’ve defined. If User X does need to have the “developer” role, remove the user from that role).
If a user is assigned to multiple roles for an AWS account, when the user logs into the AWS console, they will be prompted to choose the role they want to assume.
Support contact during the pilot period of this feature: Tracey Richardson, richardson.408@osu.edu