ServiceNow Access for CourseLeaf

This instructional guide provides the sequence of information required for requesting and granting a staff member system access to CourseLeaf.

  1. Go to go.osu.edu/IT and click the red “Sign into your account” button.
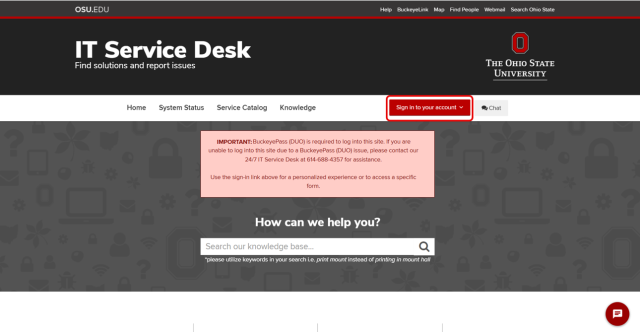
     

    Screenshot of Ohio State University IT Service Desk webpage showing navigation tabs for Home, System Status, Service Catalog, and Knowledge. Page features a red "Sign in to your account" button, a search bar for knowledge base, and a notice about BuckeyePass Duo login requirement with contact information for 24/7 IT Service Desk support.
  2. Once logged in choose the “Order Services” with the shopping cart icon in the left navigation window.
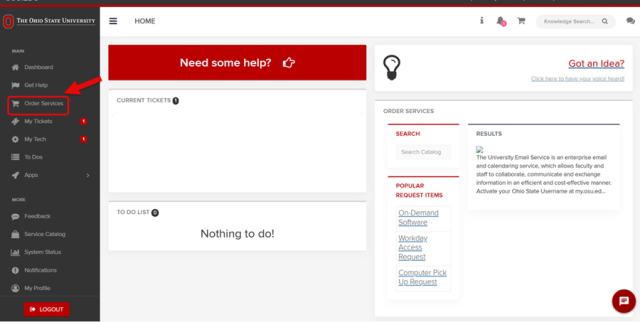
     

    Screenshot of the University's service portal dashboard showing navigation menu on left with "Order Services" highlighted by a red arrow. Main panel displays "Need some help?" banner, empty current tickets and to-do list sections, and an order services search box with popular request links and a description of the University Email Service.
  3. On the Services landing page, click Access Management.
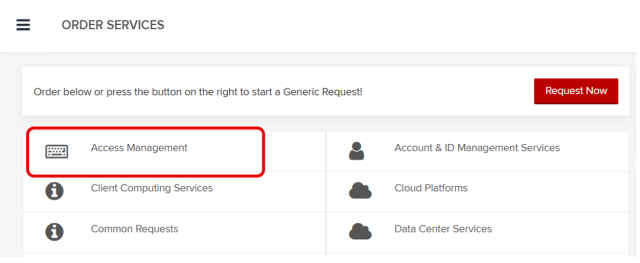
     

    Screenshot of an order services menu displaying six service categories with icons, including Access Management, Account & ID Management Services, Client Computing Services, Cloud Platforms, Common Requests, and Data Center Services. Access Management is highlighted with a red border, and a red "Request Now" button is visible in the top right corner for initiating a generic request.
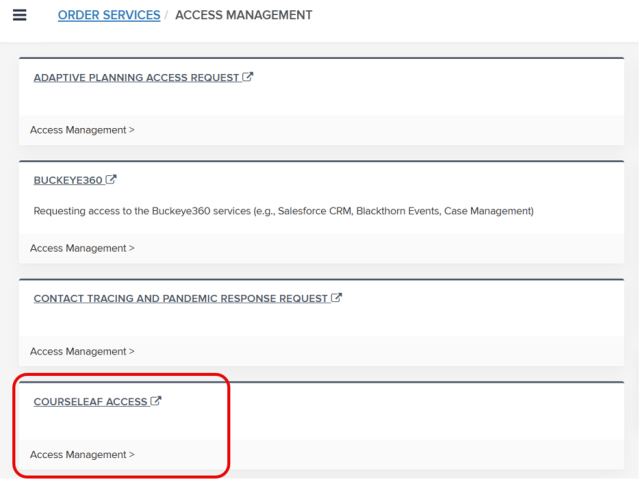
  4. Click COURSELEAF ACCESS.
     

    Screenshot of an order services menu displaying six service categories with icons, including Access Management, Account & ID Management Services, Client Computing Services, Cloud Platforms, Common Requests, and Data Center Services. Access Management is highlighted with a red border, and a red "Request Now" button is visible in the top right corner for initiating a generic request.


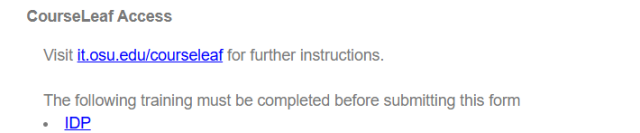
    Your user information will automatically populate.

    Screenshot of a user information form for CourseLeaf Access under Access Management service catalog. Form fields include Ohio State Username, IDM Number, Job Title, Email Address, Full Name, Employee ID, Cost Center, and Phone Number, with example data filled in.

Completing the Form

  1. Go to the next section, Access Information, and choose the module for which you want to request access. Right now, you will only see CIM (Curriculum) as the drop-down option is not yet operational.
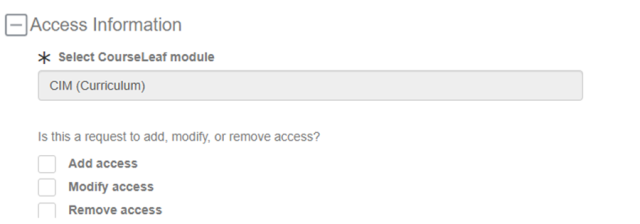
     

    Screenshot of an access information form for selecting a CourseLeaf module labeled "CIM (Curriculum)." The form includes checkboxes for options to add, modify, or remove access, with none currently selected.
  2. Then click the box of the action you want to take. 

Add/Modify Access:

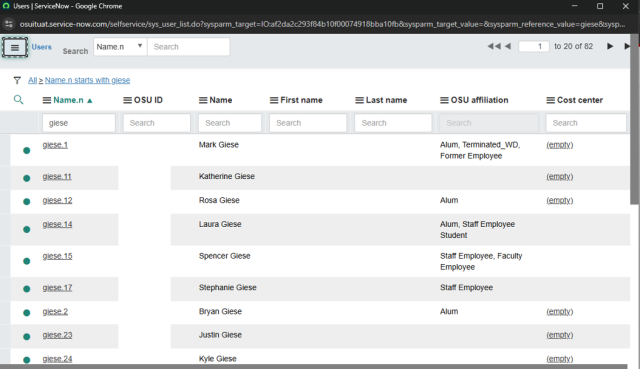
When you click the Add Access or Modify Access box you will be requested to fill in the name.n of the person for whom you are requesting access. If you know their name.n you can enter it in the box. If you don’t know their name.n you can click on the magnifying glass icon and look them up.
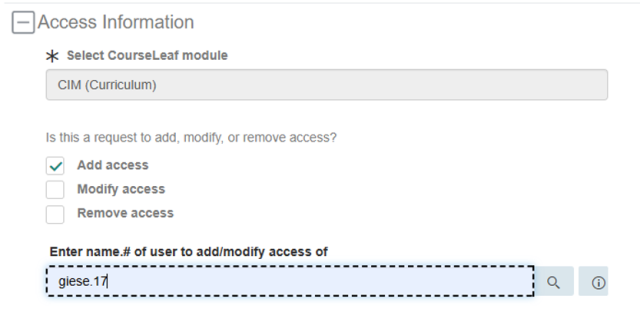
Screenshot of an access information form for selecting a CourseLeaf module, with "CIM (Curriculum)" chosen. The form includes options to add, modify, or remove access, with "Add access" checked and a user ID entered for access modification.
Screenshot of a user management table from a ServiceNow interface showing search results for users with names starting with "giese." Table columns include Name, OSU ID, First name, Last name, OSU affiliation, and Cost center, with various entries displaying user details and some cost center codes.
  1. Choose the user by clicking on their underlined name.n. That will populate the field. 

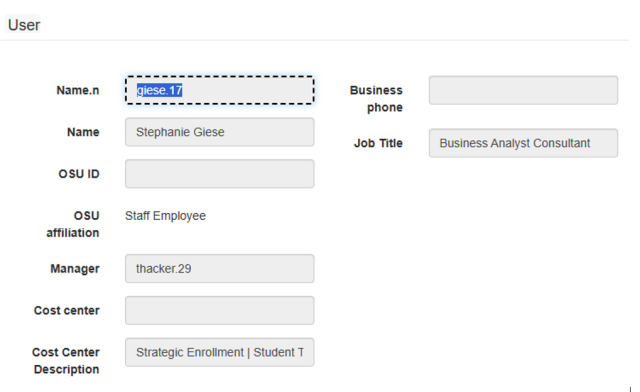
    An information icon will appear once the field is populated. Clicking on this icon will bring up a pop-up window that contains the User Information for the person for which you are requesting access.
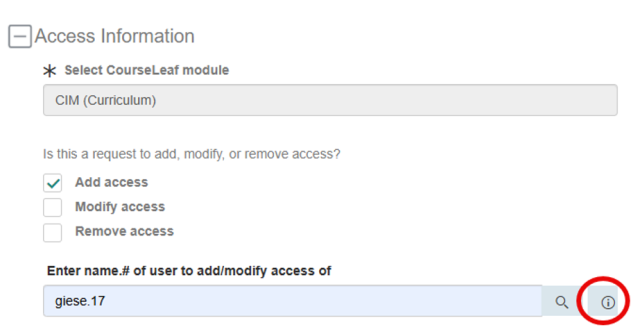
     

    Screenshot of an access information form for selecting CourseLeaf module CIM (Curriculum) with options to add, modify, or remove access. The form shows "Add access" selected, a username is entered as "giese.17," and an information icon circled in red next to the search button.
    Screenshot of a user profile form displaying fields for personal and job-related information. It includes entries such as username, full name, OSU ID, employee status, manager, cost center, and job title, with some fields filled and others blank.


  2. Ensure this is the person you intend to give/modify CourseLeaf Access to. 

    If the person you are requesting or modifying access for should have the same access as someone else in your unit, you may also choose to mirror that person’s access. If you choose to mirror access, once the user name.n is entered you may submit the form for approval.
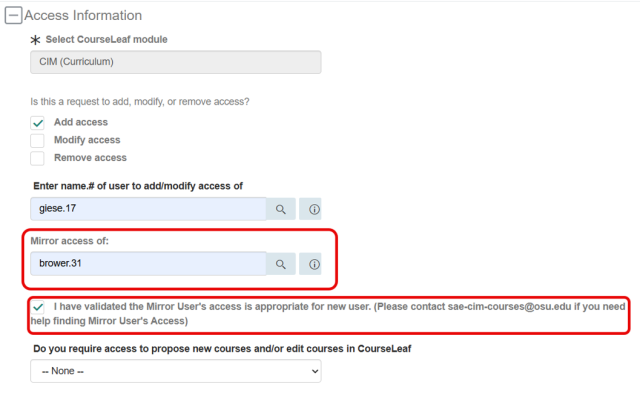
    Screenshot of an access information form for CourseLeaf module CIM (Curriculum) showing options to add, modify, or remove user access. The form highlights fields for entering a user name to add or modify access, mirroring access from another user, and a checkbox confirming validation of mirror user's access, with a dropdown menu for course proposal or editing requests.

If you are not mirroring the access of anyone you will need to choose from the drop down if this user will need to be able to initiate or make changes in CourseLeaf. You will select “Yes” or “No” from the drop-down menu.
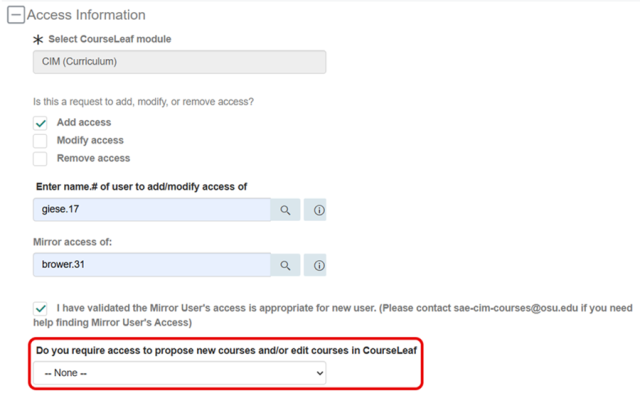
Screenshot of an access information form for CourseLeaf module CIM (Curriculum) showing options to add, modify, or remove user access. The form includes fields for entering user names, a checkbox confirming validation of mirror user access, and a dropdown menu for requesting access to propose or edit courses, highlighted in red, currently set to "-- None --".

Finally, you will be asked which CourseLeaf Roles this person will need. If you are unsure, you can click the down arrow under the Role Definitions header, and it will show all the role options and their descriptions.
 

CourseLeaf Roles and Role Definitions
Role TypeRole NameDefinition
ProposerOCA_CL_COURSE_CREATORPropose new Course Requests, Course Change Requests and One Time Offering Requests
ProposerOCA_PROGRAM_CREATORPropose new Program Requests (curriculum.osu.edu only)
Reviewer(cannot edit)OCA_ASCHON_REVIEWApprove Course Requests at ASC Honors review step
Reviewer (cannot edit)OCA_GRAD_REVIEWApprove Course Requests at Grad School review step
Reviewer (cannot edit)OCA_HONORS_REVIEWApprove Course Requests at University Honors review step
Review (cannot edit)OCA_OIA_REVIEWApprove Course Requests at Office of International Affairs review step
Reviewer (cannot edit)OCA_SL_REVIEWApprove Course Requests at Service Learning review step
ApproverOCA_ADHOC_APPROVALApprove Ad-Hoc Program requests (curriculum.osu.edu only)
ApproverOCA_ASCCAO_APPROVALApprove Course and Program Requests at ASCCAO approval step
ApproverOCA_ASC_APPROVALApprove and Program Requests at ASC approval step
ApproverOCA_BOT_APPROVALApprove Course and Program Requests at Board of Trustees approval step
ApproverOCA_CAA_APPROVALApprove Course Requests at CAA approval step (curriculum.osu.edu only)
ApproverOCA_COLLEGE_APPROVALApprove Course and Program Requests at College approval step
ApproverOCA-CR_APPROVALApprove Course Reuse request
ApproverOCA_GRAD_APPROVALApprove Program Requests at Grad School approval step (curriculum.osu.edu only)
ApproverOCA_OAA_APPROVALApprove Courses and Program Requests at OAA approval step
ApproverOCA_OUR_APPROVALApprove Course and Program Requests at OUR approval step
ApproverOCA_UNIT_APPROVALApprove Course and Program Requests at Unit approval step
Notifications OnlyOCA_DA_FYIReceive Degree Audit FYI Notification from CIM
Notifications OnlyOCA_TC_FYIReceive Transfer Credit FYI Notification from CIM
AdminOCA_ADMINISTRATORCIM Admins
View OnlyOCA_ORG_INQUIRYThis role will grant view access to all courses in CIM regardless of department/College
Warning.

Critical Note

This is just a list, you cannot take action in this window. 
  1. Click the Add button under CourseLeaf Roles and a pop-up window will appear.
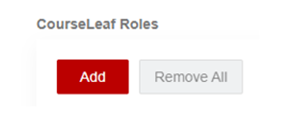
     

    Add button under CourseLeaf Roles and a pop-up window will appear

In this new window, you will be asked to select the user’s role from a drop-down menu. If you select a role that requires more information like OCA_UNIT_APPROVAL, you will be asked to select the College or D-Org. The College drop down will populate the college options, while the D-Org must be entered. 
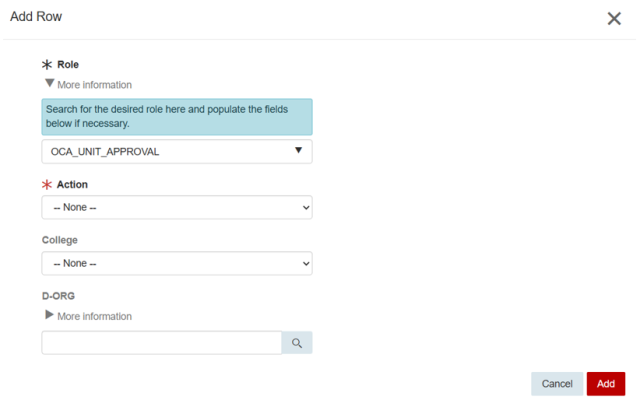
Screenshot of a form interface titled "Add Row" for entering role-related information. The form includes dropdown menus for selecting Role and Action, a text field for College, and a disabled text field for D-ORG, with Cancel and Add buttons at the bottom right.
Warning.

Critical Note

If you choose a College in the drop down, you cannot enter a D-Org. If you need a unit more specific than the College you will need to enter a D-Org. If you do not know the D-Org you can click the magnifying glass icon to search for it. 
Screenshot of a form interface titled "Add Row" for inputting role-related information. The form includes dropdown menus for selecting Role, Action, and College, a text field labeled D-ORG with a magnifying glass search icon circled in red, and buttons labeled Cancel and Add at the bottom.
Info.

Helpful Note

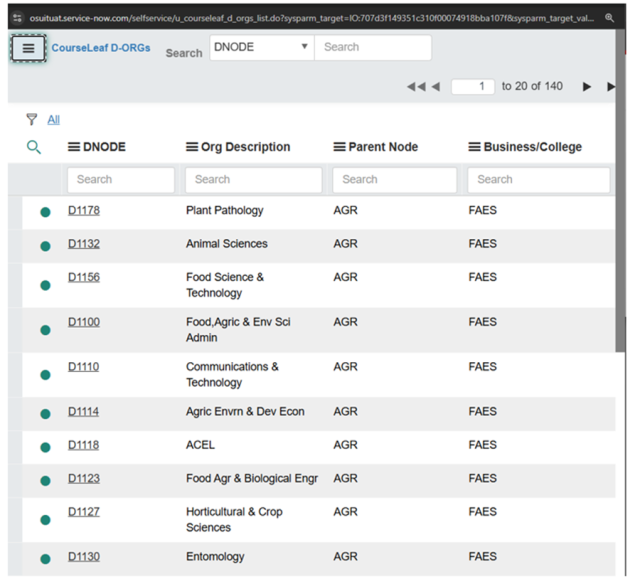
Clicking the magnifying glass will bring up a new window where you can search by DNode, Org Description, Parent Node, or College.
Screenshot of a table listing academic departments with columns for DNODE, Org Description, Parent Node, and Business/College. The table shows 10 entries related to agricultural sciences under Parent Node "AGR" and Business/College "FAES," with department names like Plant Pathology, Animal Sciences, and Food Science & Technology.
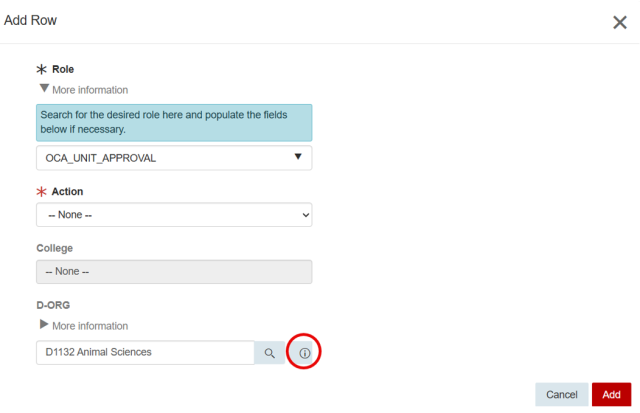
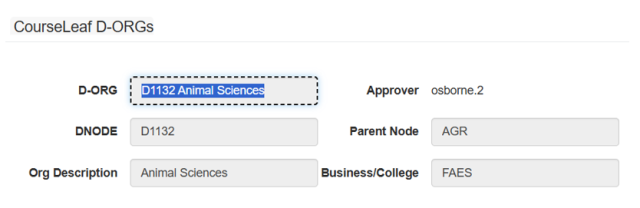
  1. Click the underlined DNode number to pull it back into the form. To ensure you have chosen the correct D-Org you can click on the information icon after the D-Org is entered or pulled in to see more information about that D-Org.
     

    Screenshot of a form interface titled "Add Row" for inputting role-related information. The form includes dropdown menus for selecting Role, Action, and College, a text field labeled D-ORG with a magnifying glass search icon circled in red, and buttons labeled Cancel and Add at the bottom.
    Screenshot of a CourseLeaf D-ORGs form displaying organizational details for D1132 Animal Sciences. Fields include D-ORG code, approver username, parent node AGR, business/college FAES, and an org description labeled Animal Sciences.
  2. Once you have filled in the Role information click Add. You will be returned to the Order Service form, and it will display the role you chose. You may add multiple roles for this user by clicking the Add button.
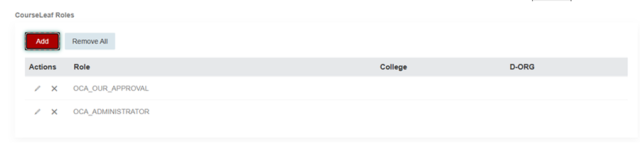
     

    to the Order Service form, and it will display the role you chose.

    From there, you can edit the information by using the pencil icon if there is an error, or
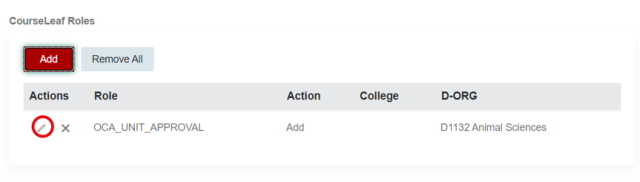
    Screenshot of a user interface for managing CourseLeaf roles, showing a table with columns for Actions, Role, Action, College, and D-ORG. The table lists one role, OCA_UNIT_APPROVAL, with an Add action linked to D1132 Animal Sciences, and includes buttons for Add and Remove All above the table. Under the Actions column header there is a pencil and X icon. The pencil icon is circled in red indicating the ability to edit.

    You can remove the row, if it is the incorrect role by clicking the X icon or Remove All button. 
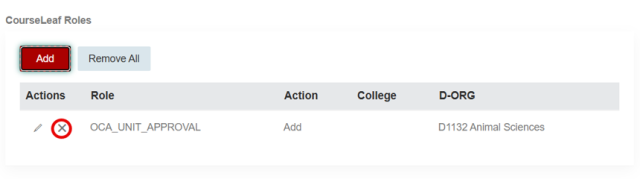
    The table lists one role, OCA_UNIT_APPROVAL, with an Add action linked to D1132 Animal Sciences, and includes buttons for Add and Remove All above the table. Under the Actions column header there is a pencil and X icon. The X icon is circled in red indicating the ability to remove the row.

    If you select either of these options, a confirmation pop up will appear and you can choose to cancel the removal action or confirm it by clicking Remove.
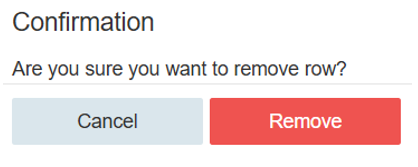
     

    Screenshot of a confirmation dialog box asking if user wants to remove a row. It includes a question prompt and two buttons labeled Cancel in light blue and Remove in red for user action.

Removing Access

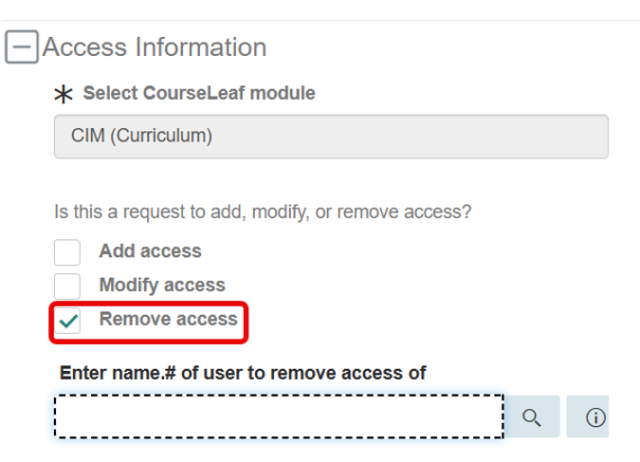
If a person in your unit leaves the University or transfers to another position you must remove access to CourseLeaf. To remove access, check the Remove Access box under the Access Information header. Then enter the user’s name.n.
Screenshot of a confirmation dialog box asking if user wants to remove a row. It includes a question prompt and two buttons labeled Cancel in light blue and Remove in red for user action.

You may also

Submitting the Request

  1. When you have added, modified or removed access for your user(s), you will go to the upper right corner of the screen and click the Add to Cart button or the Order Now button. If this is the only person you are requesting/modifying/removing access for, click Order Now. If you have multiple people you are requesting/modifying/removing access for, click Add to Cart.
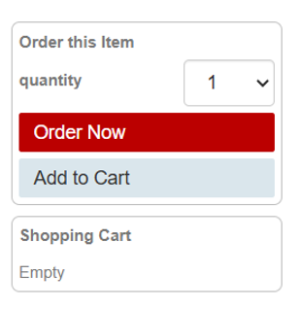
     

    Screenshot of an interface showing an order section with a quantity dropdown set to 1, a red "Order Now" button, and a gray "Add to Cart" button. Below, a shopping cart section displays the status as "Empty," indicating no items have been added yet.

If you choose to Add to Cart your Shopping Cart will change from “Empty” to showing all the items you have placed in your cart.
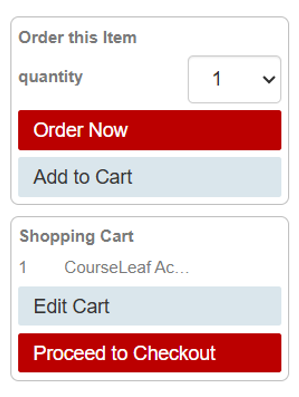
Screenshot of an interface showing options to order an item with quantity selection, "Order Now" and "Add to Cart" buttons. Below, a shopping cart summary displays one item labeled "CourseLeaf Ac..." with buttons to "Edit Cart" and "Proceed to Checkout."
  1. Once you have added all the items to your cart, you will click Proceed to Check Out.

After clicking Order Now or Proceed to Check Out you will be taken to a new screen to confirm your request.
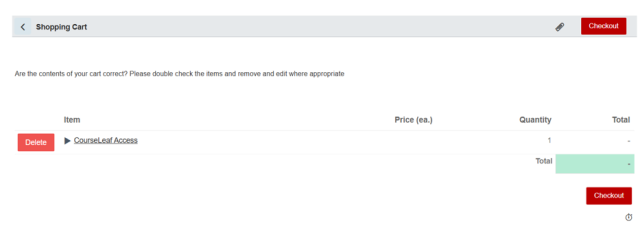
Screenshot of an online shopping cart displaying one item labeled "CourseLeaf Access" with a quantity of one and no price listed. The interface includes red "Delete" and "Checkout" buttons, a prompt to review cart contents, and a total price section showing a blank value.
  1. If this information is accurate, click the Check Out button.

You will then be taken to a confirmation screen showing that your order has been submitted and the order is assigned a request number.  You can track the progress of your request by using this request number.
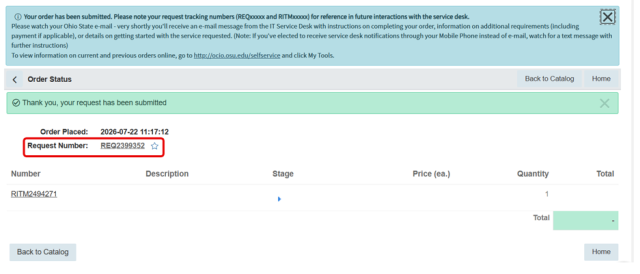
 

Screenshot of an order confirmation page showing order placement date and time as 2023-07-22 11:17:12 and a highlighted request number REG2399352. The page includes a table listing an item with its number, description, stage, price, quantity, and total, along with navigation buttons for catalog and home.