
Email Learners Registered for Instructor-Led Training

Email can be an effective way of reaching those learners who are registered and planning to attend your ILT session. Emailing leaners is in addition to email that is triggered automatically from BuckeyeLearn. 

As a best practice, sending email users should be used judiciously for critical reminders or to answer common questions related to that session. 


Critical Note:

If you find that additional information or detail is needed in the event or session, please contact your ILT or OU Administrator.  Adding helpful information to the session or event may reduce the need to send additional emails.

 For additional information, take the Creating and Managing Instructor-Led Training online course, or visit Cornerstone's online help.

  1.  Navigate to the Roster page.
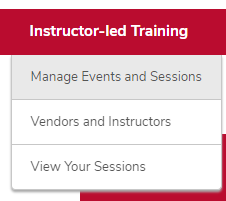
    1. Hover over the ILT tab.
    2. Click Manage Events & Sessions. 

      The ILT menu expanded with the Manage Events & Sessions option circled
    3. Click the View Sessions button on the same line as your event. 

      The Manage Events & Session page with the sessions link circled
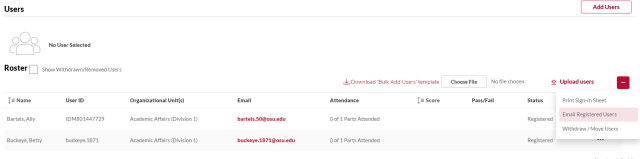
    4. Click the Roster button

      roster button

      on the session for which you want to email learners.

  2. Click the Actions icon in the User section, then click Email Registered Users

    the email registered users menu item highlighted
  3. Create your email.  

    the email page
     

    Critical Note:

    Do not use the deep link functionality on this page. It will not produce a link that learners can use. If you need a link to a session, event, or other BuckeyeLearn page, contact your OU administrator, who can provide you with a link. 


    Helpful Note:

    Click the Document Manager icon 

    document manager icon

    to add an attachment to your email.


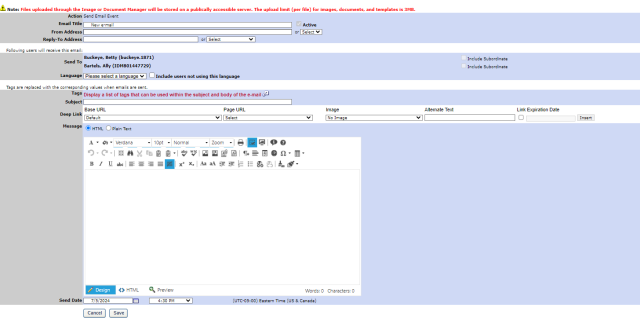
    1. Type the email title.  


      Helpful Note:

      This title will not be visible to learners.

    2. Type your email address in the From Address.
    3. Type your email in the Reply-To Address.
    4. Review the Send To section.  


      Critical Note:

      These are the registered learners in the session.

      Do not check the Include Subordinates checkbox.

      the send to section
    5. Type a Subject.  


      Helpful Note:

      This will be the subject of the email that learners will receive.

    6. Type the text of the email.  


      Helpful Note:

      Consider using Plain Text for simple messages and HTML for messages with images or formatting. Not all recipients are able to receive HTML messages.

      the HTML and Plain Text message options
    7. Select a send date and time to send the email at a later time, if desired.
  4. Click the Save button to send the email.