The Windows App can be used to access Azure Virtual Desktop instead of logging in through the web. Using the Windows App provides a more robust environment for virtual desktop users. It does require the installation of a small application, but it only needs to be done once and will provide a more consistent faster environment for users.
Installation of the client will depend on the device. There are two main types of devices. Managed and Unmanaged.
- Managed Devices are devices that are owned by the university and are issued to people during their time with the university.
- Unmanaged Devices are personal devices brought on to campus and are not managed by any area at the university.
- Currently Mac is in public preview testing. More information can be found at External Identities and macOS
Managed Devices
Managed Devices at the University install software from the Software Center for Windows devices or Jamf for macOS. Mobile devices will use the app store of the mobile device.
Once the application is installed on the device, remember to log in using the correct OSU credentials. If you have any issues with your password, please see Identity Management for information on changing passwords.
Ohio State University Accounts:
Windows Managed Devices
A Windows based PC or laptop can install the Virtual Desktop Software using the Software Center.
Open the Software Center on the managed device.
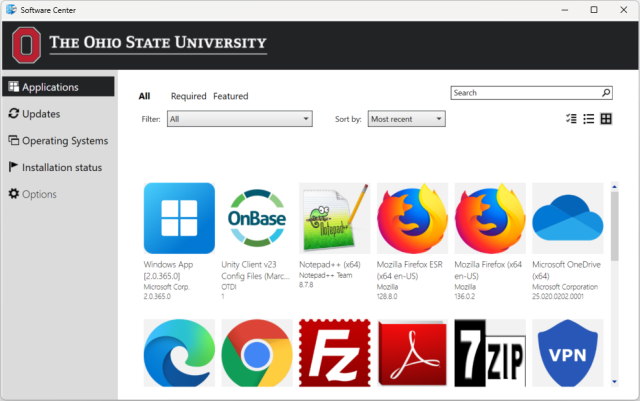
In the Software Center select Windows App and click Install.
The installation process is automated and should complete quickly.
Once the application is installed it can be opened and used to connect to a virtual device or application.
MacOS Managed Devices
To install the Windows App on a managed MacOS device start by opening Self Service.
In Self Service look for Windows App (Microsoft Remote Desktop) and select Install.
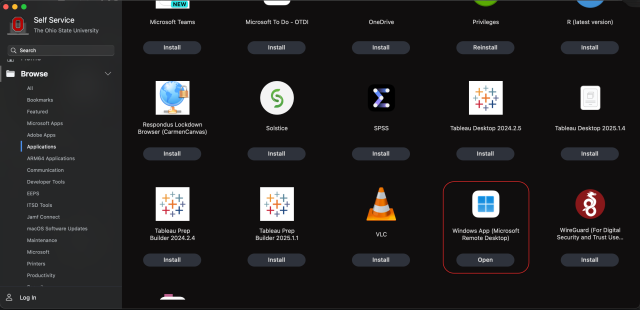
Once the installation is successful select Open to open the application.
iOS Managed Devices
Installing on iOS is a straightforward process.
- Access the App Store on your iOS device.
- Search for Windows App.
- Click Install.
Once the application is installed it can be opened and used to connect to a virtual device or application.
Android Managed Devices
Installing on Android is a straightforward process but the experience will vary from devices.
- Access the App store for your Android device and search for Windows App.
- Click Install and walk through the installation process.
Once the application is installed it can be opened and used to connect to a virtual device or application.
Unmanaged Devices
An unmanaged device is any device that is not managed by the Office of Technology and Digital Innovation or another service desk area on campus. This is typically reserved for personal devices such as a student's laptop or a faculty member's home computer.
Unmanaged (Personal) Devices
Personal Devices
Access the web portal for Virtual Desktop.
In the lower left-hand corner click the link labeled Download.
This will bring you to a download screen of the four main versions of the Windows Application. Choose the appropriate version for your personal device and walk through the installation process for your personal device. The four options are:
- Windows
- macOS
- Android
- iOS
Once the application is installed it can be opened and used to connect to a virtual device or application.