Instructions from the Office of the University Registrar for assigning or inactivating a student group for an individual student or batch of students.
Assign a Student Group to an Individual Student
- Navigate to the Student Groups page.
- Enter Search Criteria, then select the Search button link to open the student's record.
- To add a student to a Student Group, complete the following fields (if applicable) on the Student Groups page:
- Academic Institution (required and prefilled with OSUSI )
- Student group (required) --enter the Student Group code or select the Lookup Student Group link (magnifying glass icon) to search for or select the group from those available.
- Effective Date (required)
- Status (required) - select
Comments
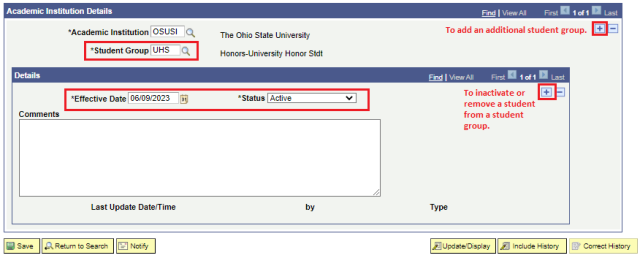
- Another student group may be added by selecting the Add a new row at row 1 (plus sign icon) link in the Academic Institution Details section by inserting a row that contains Academic Institution and Student Group and then completing the Details section.
- To save, select the Save button link.
Inactivate a Student Group from an Individual Student
- Navigate to the Student Groups page.
- Enter Search Criteria, then select the Search button link to open the student's record.
- If necessary, use the Show next row (right arrow icon) to locate the student group that needs inactivated.
- In the Details section, select the Add a new row at row 1 link (plus sign icon) to insert a new row.
- The Effective Date should be changed to the date the student will no longer be considered part of this Student Group.
- In the screenshot below, the student is considered to be in the UHS Student Group as of 1/1/2023 and will be inactivated on 6/9/2023.
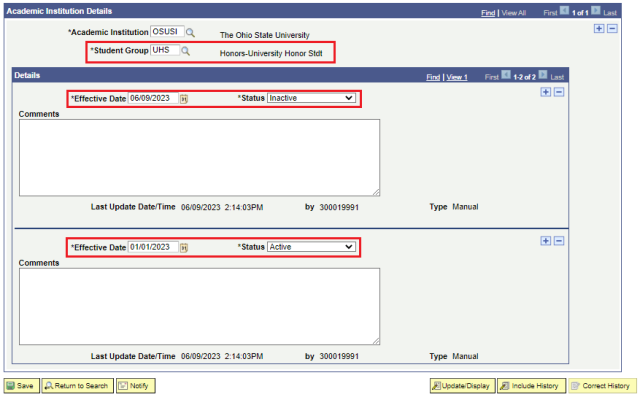
- To save, select the Save button link.
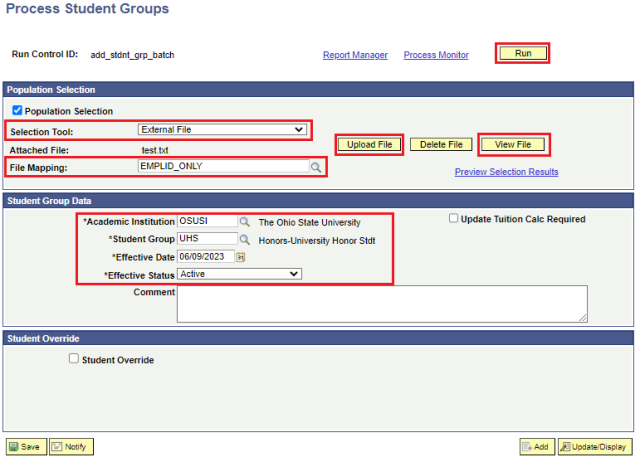
Assign or Inactivate a Student Group to a Batch of Students
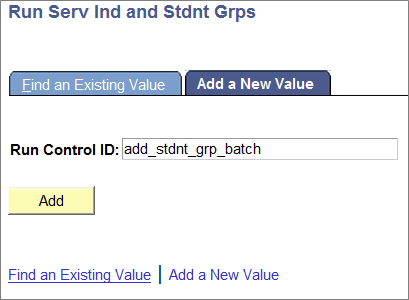
- Navigate to the Process Student Groups page.
- Enter Search Criteria, then select the Search button link to open the student's record.
- Select the appropriate Run Control ID.
- In the Population Selection section, select External File as the Selection Tool.
- If not already created, create the Text File (.txt) containing the list of EMPLIDS on your personal computer. Learn how to Create a Text File (.txt) for batch processing.
- Select the Upload File button then the Choose File link button to browse for the already created and saved text file. Once the file is located and selected, select Upload to upload the file.
- To view the details of the file that was uploaded, select the View Attachment (View File button). Pop-up blockers may need to be turned off.
- A new tab will open in your browser where the list of student IDs are listed. The tab can be closed when done viewing the list.
- Select EMPLID ONLY as the File Mapping.
- In the Student Group Data section, complete the following fields:
- Academic Institution (required and prefilled with OSUSI )
- Student Group (required) enter the Student Group code or select the Lookup Student Group link (magnifying glass icon) to search for or select the group from those available.
- Effective Date (required)
- Status (required ) -select
- Comments
- Select the Run button link to begin the process. The Process Scheduler Request page will open.
- Select the OK link button to schedule the request.
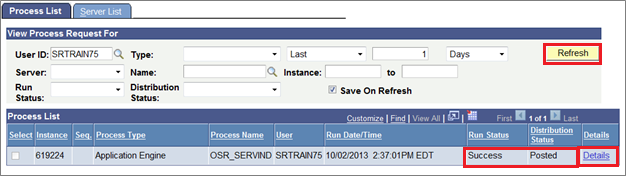
- Select the Process Monitor link (located near the Run button link) to open the Process List where you can view the process progress.
- Select the Refresh button link to view the current process status. Continue to Refresh until the process is finished. The process is finished when the Run Status is Success, and the Distribution Status is Posted (Queued and Processing indicate the process is still running).
Once the process has finished, select the Details link to open the Process Detail.
- Select the View Log/Trace link in the Actions section link to access the File List created.
- Select the .stdout link from the Name column. A new browser tab will open. The success of your batch job will only state if the job ended normally or resulted in a failure. There is no count or verification of EMPLIDs for the records included in the batch job.