Introduction
In OSUAD and OSUADT, (3) exportable certificate templates are provided for your use:
- OSUAD(T) SSL Server Exportable Certificate
- OSUAD(T) Code Signing
- OSUAD(T) Apps Exportable Certificate
OSUAD(T) SSL Server Exportable Certificate
This certificate template type is an exportable certificate for server authentication that can be used in scenarios such as High Availability for SQL or other applications where the servers must maintain a synchronized copy of the certificate and the Common/DNS names must be suppled during the certificate request process.
OSUAD(T) Code Signing
This certificate template type is an exportable certificate specifically designated in the Key Usage as being for code signing. Depending on your code signing requirements, please make sure to provide the publisher name identically in the required information during the certificate request process.
OSUAD(T) Apps Exportable Certificate
This certificate template type is an exportable certificate with legacy keys designed specifically to be compatible with certificate authentication for Entra ID applications. The common name supplied in the request should match your Entra ID application name in the cloud.
Notes
All of these template types require Certificate Manager Approval. In order for these approvals to be processed in an orderly manner, please submit a generic RITM or CON to the Active Directory Services team in Service Now by:
- Creating a generic RITM in the Service Now web application
- Alternatively, e-mail cio-ad-support@osu.edu
Your subject should contain the following information:
Request for an exportable [Application] [Code Signing] [SSL Server] Certificate
Example: Request for an Exportable Application Certificate
In the body of your generic request, please provide the following as applicable:
- Entra Application Name + Servers likely to use this certificate
- Publisher Name (for code signing certificate)
- Server Name(s) and requested vanity names (normally cnames in DNS)
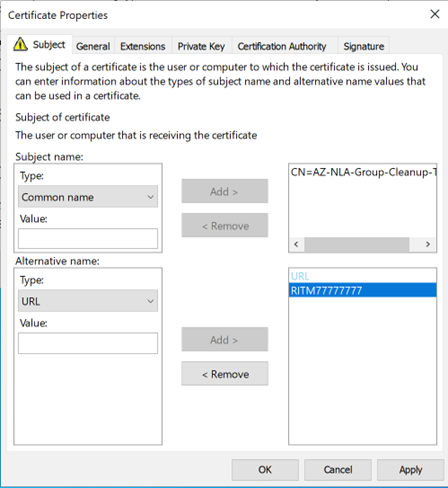
Write down the RITM/CON number you receive in response to your generic request and make sure to place it as a URL value in the Subject Alterative Name. This allows AD Engineers to match your request to the certificate in the database.
Example – Entra Application
Before you begin, have the name of the Entra application you are requesting a cert for at your disposal. In our example below we will use AZ-NLA-Group-Cleanup-TST for an Entra Application. Put in a generic request to Active Directory team
- Short Description: Request for an exportable application certificate
- Body: Provide the application name and the description of what the application is doing. If applicable, include the names of servers the cert is going to be installed on.
- Record the RITM# or CON#
- On any server or workstation joined to OSUAD(T) domain, right click on Start and then Run
- Type certlm.msc
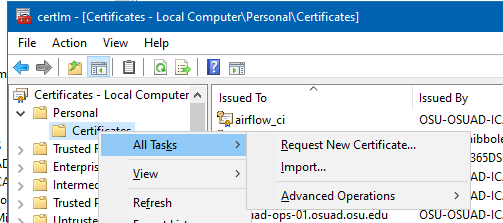
- In the Certificates console window expand Personal and then Certificates
Right click on Certificates, select All Tasks and click on Request New Certificate…
- On Before You Begin page, click Next
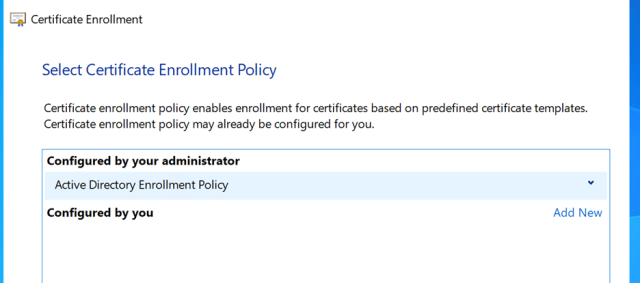
On Select Certificate Enrollment Policy, click Next
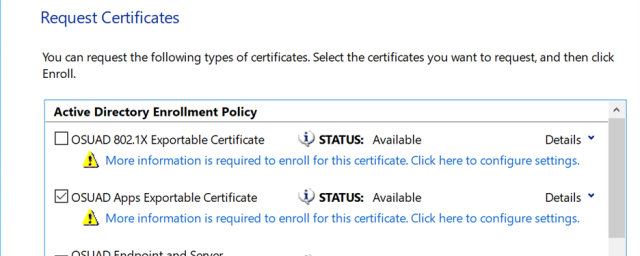
On quest Certificates check the selection box for the OSUAD(T) Apps Exportable Cert or OSUAD(T) Code Signing Cert and click on “More information is required to enroll…”
In the Certificate Properties for the Subject name enter the application or publisher name recorded in step #1as type Common name. For the Alternative name, select type URL and enter the RITM# or CON# recorded in step #1. Click OK and then Enroll on the Request Certificates window.
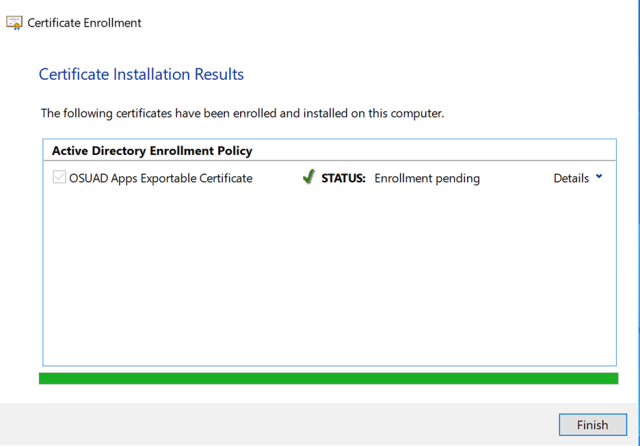
On the Certificate Installation Results click Finish.
- Wait until your RITM# is complete before proceeding.
- After the RITM# is complete, log in to the server or workstation you requested the certificate from and open the certificates console (Run > certlm.msc)
- Expand Certificates – Local Computer, Personal, and then Certificates
- If you do not see your new certificate under Personal, Certificates you can do the following:
- Wait until policy refreshes (can take up to two hours)
- Run gpupdate /force to force the policy refresh
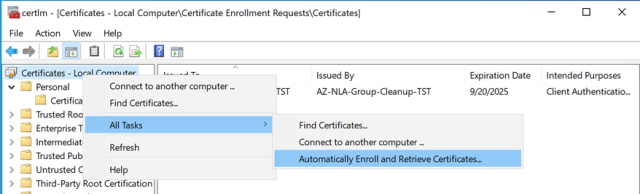
Right click on the Certificates – Local Computer > All Tasks > Automatically Enroll and Retrieve Certificates…
- Click on Next on Before You Begin page
- Click on Enroll on Request Certificates page
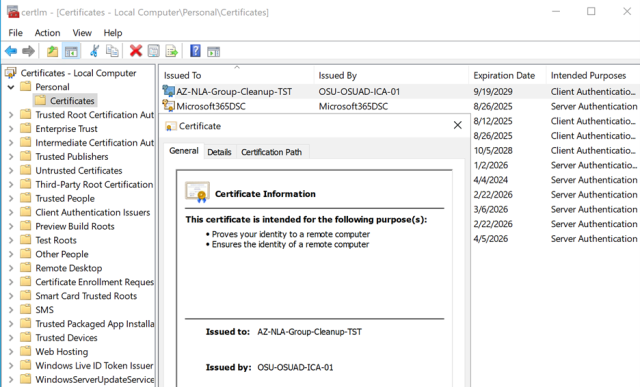
The newly issued cert will appear under Certificates – Local Computer > Personal > Certificates
Additional Notes/Comments
The workflow for code signing certificates and SSL server exportable certificates should be almost identical. Please make sure for SSL server exportable your hostnames are I the common name and the DNS SAN field, and any vanity names or entered as DNS SAN entries as well. For code signing certificates, pay attention to any requirements for your tool or application as to whether common name or FULL DN, etc. formats need to be used.