- Select 'Site' > 'Manage Sites'.
- Click 'New' to set up a new site or select an existing Dreamweaver site and click the 'edit' icon.
- In the Site Setup dialog box, select the Servers category and do one of the following:
- Click the Add New Server button to add a new server.
Select an existing server and click the Edit Existing Server button.
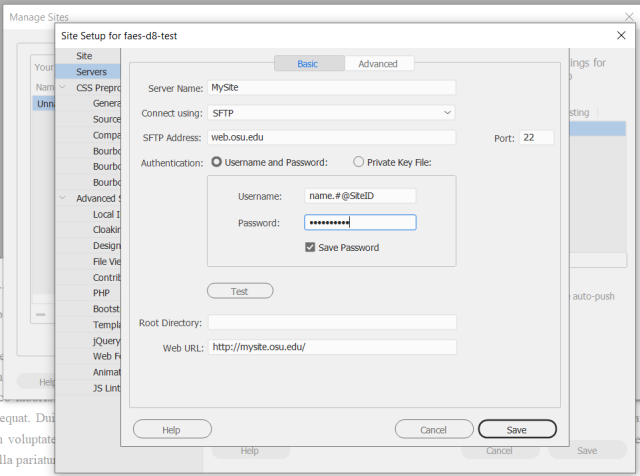
- In the Server Name text box, specify a name for the new server. You can choose any name that you require.
- Select SFTP from the Connect Using pop-up menu.
- In the SFTP Address text box, enter ‘web.osu.edu’. Do not add a protocol name in front of the address. (Like ‘ftp://’ or ‘https://’)
- Note: Port 22 is the default port for receiving SFTP connections. Do not use Port 21.
- In the Username text box, enter your OSU Name.# followed by the ‘@’ symbol and the Web Hosting SiteID.
- So if your name.# was ‘Smith.10’ and you’re connecting to the Development space for the ‘Mysite’ account, your username would be ‘smith.10@mysite-dev’.
- In the Password text box, enter the password associated with your OSU name.# account.
- Click Test to test your FTP address, username, and password.
- (Optional) Dreamweaver saves your password by default. Deselect the Save option if you prefer a prompt each time you connect.
- (Optional) In the Root Directory text box, enter the directory you store documents which are visible to the public.
- In the Web URL text box enter the URL of your website (for example, https://www.mysite.com).
- Dreamweaver uses the Web URL to create site root-relative links, and to verify links when you use the link checker. For a more extensive explanation of this option, see Advanced Settings category.
- Click Save to close the Basic screen. Then in the Servers category, specify whether the server you just added or edited is a remote server, a testing server, or both.
For Help with troubleshooting FTP connectivity problems, contact the OSU IT Service Desk.