WordPress™ is a Content Management System (CMS) written in PHP and paired with MySQL. It’s a versatile tool that enables those with minimal technical knowledge to create, manage, and publish complex websites.
Admittedly, there are many ways to install WordPress™ 6.8 into your OTDI Web Hosted environment. This document is a step-by-step outline of just one preferred way.
Prerequisites
- An OTDI Web Hosting Account with Admin rights
- A MySQL Database for your WordPress™ Site
- SSH Shell access to your Account
Installation
Install New Server Image
Navigate to your OTDI Web Hosting Dashboard.
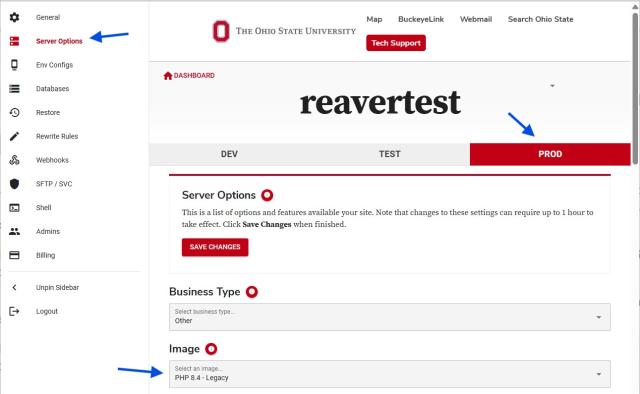
- Login with your Ohio State username (lastname.#) credentials
- Click on the Environment you wish to use: [Dev|Test|Prod]
- Click on ‘Server Options’ in the Lefthand Menu
- Change the ‘Image’ to PHP 8.4 – Legacy
- Allow 30 minutes for the existing environment to get rebuilt with the new image
Create a MySQL Database and Database User for WordPress™:
Continue using your Web Hosting Dashboard.
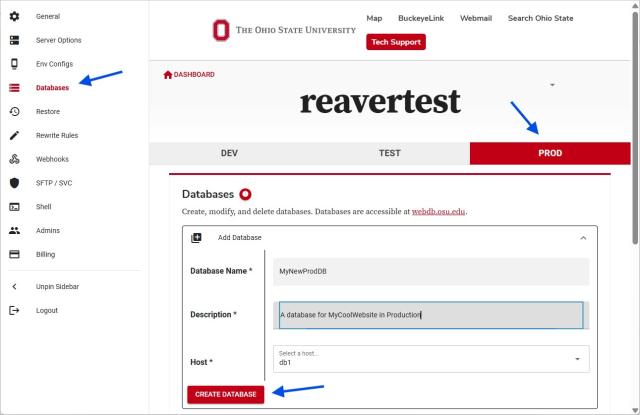
- Click on ‘Databases’ in the Lefthand menu & then ‘Add Database’ on the right. (Not Shown)
- Give your DB a unique name & description, keeping in mind that you could have multiple databases, in multiple environments, under one Web Hosted account.
- Click ‘Create Database’
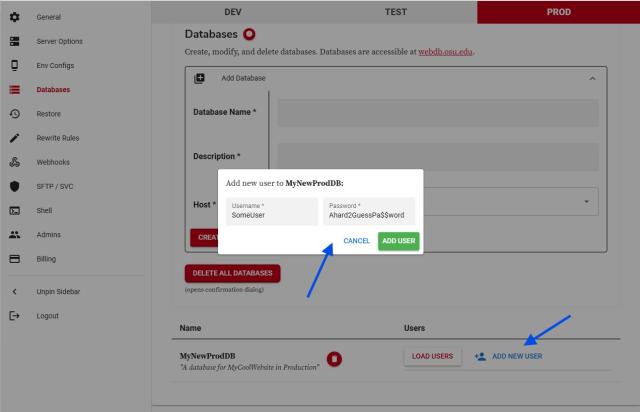
- Once created, click ‘Add New User’
- Enter a unique Username & Password, keeping in mind that you could have multiple databases, in multiple environments, under one Web Hosted account.
- Record the database name, username and password you just created for use when configuring WordPress™.
- Click ‘Add User’.
Download and Install WordPress:
- Connect to your account with your favorite terminal program and SSH Secure Shell.
- Change to a temporary directory under your account’s Webroot.
[user@webssh ~]$ cdweb && cd tmp- Get the latest ‘Stable’ version of WordPress™
[user@webssh tmp]$ wget https://wordpress.org/latest.tar.gz- Extract the downloaded WordPress™ archive to your account’s Document Root, removing the default ‘wordpress’ installation directory
[user@webssh tmp]$ tar -xzvf latest.tar.gz --directory ../htdocs --strip-components=1- Return to the Webroot directory
[user@webssh tmp]$ cdweb- Remove existing files from the Document Root (htdocs)
[user@webssh reavertest]$ rm htdocs/index.html htdocs/favicon.ico
[user@webssh reavertest]$ rm -Rf htdocs/index_files/- Change the ‘Group’ ownership of the WordPress™ files to our Apache User Group (www)
[user@webssh reavertest]$ chgrp -R www htdocs/- Tighten the permissions on publicly accessible files & directories
[user@webssh reavertest]$ find htdocs/ -type d -exec chmod 755 {} \;
[user@webssh reavertest]$ find htdocs/ -type f -exec chmod 644 {} \;
Configure WordPress
- Navigate to your Document Root and copy the sample configuration file.
[user@webssh reavertest]$ cdweb && cd htdocs
[user@webssh htdocs]$ cp wp-config-sample.php wp-config.php- Edit the wp-config.php file with VI or Nano. Edit the following ‘Database Settings’ to include the database connection details you created earlier
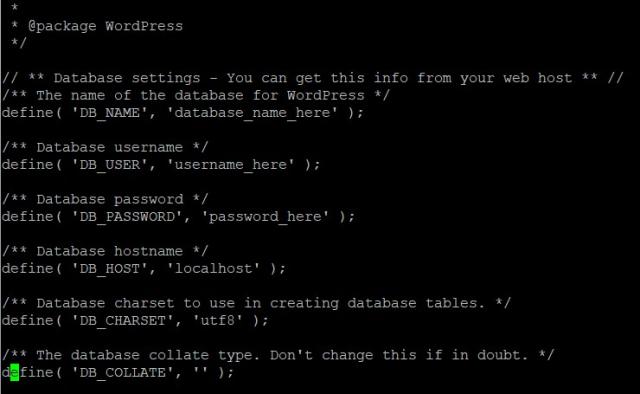
define( 'DB_NAME', 'MyNewProdDB' );
define( 'DB_USER', 'SomeUser' );
define( 'DB_PASSWORD', 'Ahard2GuessPa$$word' );
define( 'DB_HOST', 'webdb1.service.ohio-state.edu' );
- Save your edits & exit the terminal
Complete the Installation of WordPress™ with your Web Browser:
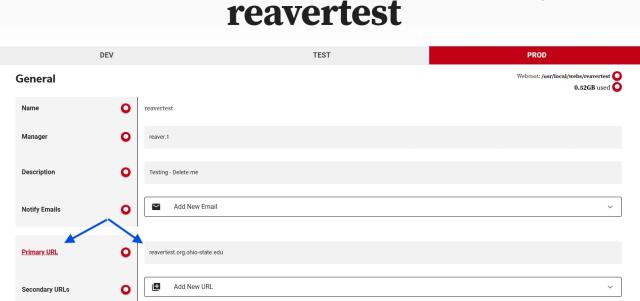
- Open your favorite web browser and navigate to your Site’s Primary URL. (You can find this URL in your Web Hosting Dashboard, under ‘General’.)
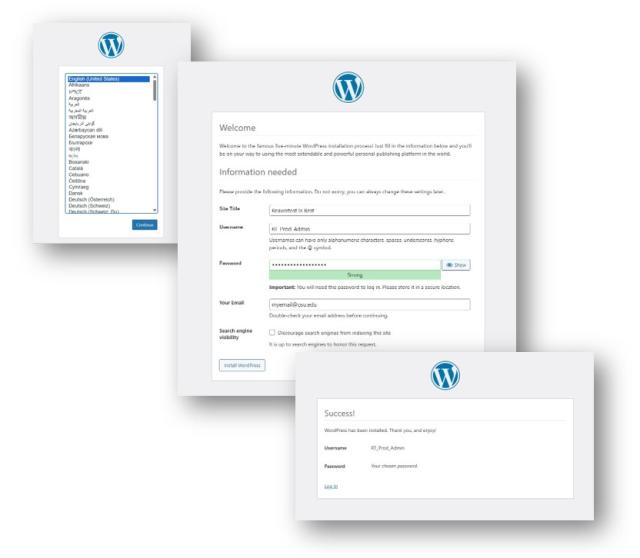
- Follow the on-screen instructions to complete your WordPress™ installation, including setting up the site title, admin username, and a very strong password.
Congratulations! Your basic WordPress™ installation is complete.
Additional Things to Consider
Install These Free Plugins
WordPress™ plugins are software components that extend the functionality of a WordPress™ website. They allow users to add new features, integrate with third-party services, enhance security, improve performance, and customize their site without needing to write or modify core code. We don’t restrict which plugins you can use, but we do have a few we strongly recommend. Please consider installing the Plugins detailed in this support article. (At least the first 4 anyway)
Keep track of URL settings if using an alternate development location
Unlike other web applications which primarily use relative links, WordPress™ tends to use the site’s FQDN in absolute links. This means that changing the location of a WordPress™ site (i.e.: From Dev to Production) can be complicated. If you plan to move or copy your site after initial development, you’ll want to write down all settings that require you enter a FQDN. For more information about the differences please see Absolute & Relative links
Load Balancer Awareness
Some features of WordPress should be made aware of the AWS Load Balancer we utilize for increased speed and availability; Especially if you use plugins that leverage Client IPs. To enable this, edit your wp-config.php file and add the following lines to the top of the file:
if(isset($_SERVER['HTTP_X_FORWARDED_FOR']))
{ $forwarded_address = explode(',',$_SERVER['HTTP_X_FORWARDED_FOR']);
$_SERVER['REMOTE_ADDR'] = $forwarded_address[0];
}
Match Your Scripting Language
WordPress is written using PHP as its scripting language, and PHP is constantly being updated & improved. If you find a need to upgrade the version of PHP installed in your environment, you can do it yourself by following this Support Article.