To use MS Access with the student data in the RAE, you will need to:
- Have a user account established for the RAE
- Retrieved your login credentials from the Privileged Access Management (PAM) system
- Install and configure an ODBC driver for MS Access
MITS Customers
University units that are MITS customers can download and install the Amazon Redshift ODBC 64-bit driver for MS Access from the Software Center.
- Use the Windows search field on the taskbar to open the Software Center.
- Click the Amazon Redshift ODBC Driver 64-bit icon
- Click the Install button to install the driver on your local machine.
Non MITS Customers
Non-MITS customers will need to have their IT support team manually download and install the Redshift ODBC driver, which is available from the AWS website. Choose the correct 64/32 bit version of the driver based on your version of MS Office. In almost all cases, the 64-bit version should be used.
The following steps to configure the ODBC driver are for users who are not administrators of their machines. This should only need to be done once.
Connect to the RAE Student Data via the ODBC Data Source
Open an MS Access database
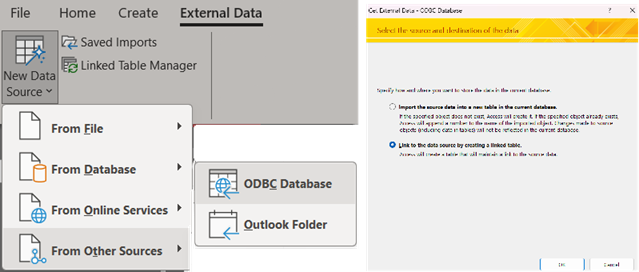
- Click External Data
- Click the New Data Source button drop-down
- Click From Other Sources
- Click ODBC Database
- Select 'Link to the data source by creating a linked table'
- Click OK
In the Select Data Source window
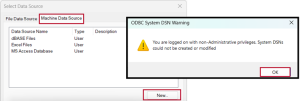
- Click the Machine Data Source tab
- Click the New button
- A warning message will appear: “You are logged on with non-administrative privileges. System DSNs could not be created or modified”.
- Click OK to continue.
- Accept the default type of data source (“User Data Source”) and click Next to continue.
- Select the Amazon Redshift (x64) driver from the list and click Next to continue.
- In the resulting summary window, click Finish to access the Driver Setup window.
In the Driver Setup Window
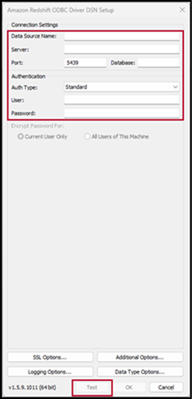
- Enter the following values (but DO NOT CLICK OK yet)
- Data Source Name: [Display name for the configured driver, e.g., Redshift_RAE_PRD. This is
what you’ll select when you want to link to RAE data in the future] - Server: redshift-prd.rae.osu.edu
- Port: 5439
- Database: rsprd
- Auth Type: Standard
- User: [Your IDMxxxxxxx value, copied from PAM]
- Password: [The Password value for RedShift PRD IDMxxxxxxx, copied from PAM]
- Data Source Name: [Display name for the configured driver, e.g., Redshift_RAE_PRD. This is
- Click Test to verify your connection settings.
- A “SUCCESS! Successfully connected to the data source!” message should display.
- Click OK to return to the Driver Setup window.
Help Desk /TECH support note
These connections can also be created by opening the ODBC Connection Manager directly (32 or 64-bit based on vesion of MS Office). Either way when you create this connection for a user, make sure to create them as a “User DSN” rather than a “System DSN” while running under the actual user’s account, not your own admin account if possible. The ODBC dialog will display a UAC prompt, but a non-admin account is sufficient to get past the prompt. If you must create the connection as a “System DSN”, then make sure to remove the password from the configuration after testing the connection. Redshift/RAE passwords are auto-rotated every 90 days. If the connection is not created as a “User DSN”, then the user will be unable to update the password when it rotates unless they have admin privileges on their machine.